React Native Image Picker
A React Native module that allows you to use native UI to select a photo/video from the device library or directly from the camera.
| iOS | Android |
|---|---|
 |
 |
Before you open an issue
This library started as a basic bridge of the native iOS image picker, and I want to keep it that way. As such, functionality beyond what the native UIImagePickerController supports will not be supported here. Multiple image selection, more control over the crop tool, and landscape support are things missing from the native iOS functionality - not issues with my library. If you need these things, react-native-image-crop-picker might be a better choice for you.
Install
NOTE: THIS PACKAGE IS NOW BUILT FOR REACT NATIVE 0.40 OR GREATER! IF YOU NEED TO SUPPORT REACT NATIVE < 0.40, YOU SHOULD INSTALL THIS PACKAGE @0.24
npm install react-native-image-picker@latest --save
Automatic Installation
react-native link
IMPORTANT NOTE: You'll still need to perform step 4 for iOS and steps 2 and 5 for Android of the manual instructions below.
Manual Installation
iOS
- In the XCode's "Project navigator", right click on your project's Libraries folder ➜
Add Files to <...> - Go to
node_modules➜react-native-image-picker➜ios➜ selectRNImagePicker.xcodeproj - Add
RNImagePicker.atoBuild Phases -> Link Binary With Libraries - For iOS 10+, Add the
NSPhotoLibraryUsageDescription,NSCameraUsageDescription,NSPhotoLibraryAddUsageDescriptionandNSMicrophoneUsageDescription(if allowing video) keys to yourInfo.plistwith strings describing why your app needs these permissions. Note: You will get a SIGABRT crash if you don't complete this step
<plist version="1.0">
  <dict>
    ...
    <key>NSPhotoLibraryUsageDescription</key>
    <string>$(PRODUCT_NAME) would like access to your photo gallery</string>
    <key>NSCameraUsageDescription</key>
    <string>$(PRODUCT_NAME) would like to use your camera</string>
    <key>NSPhotoLibraryAddUsageDescription</key>
    <string>$(PRODUCT_NAME) would like to save photos to your photo gallery</string>
    <key>NSMicrophoneUsageDescription</key>
    <string>$(PRODUCT_NAME) would like to your microphone (for videos)</string>
  </dict>
</plist>
- Compile and have fun
Android
-
Add the following lines to
android/settings.gradle:include ':react-native-image-picker' project(':react-native-image-picker').projectDir = new File(rootProject.projectDir, '../node_modules/react-native-image-picker/android') -
Update the android build tools version to
2.2.+inandroid/build.gradle:buildscript { ... dependencies { classpath 'com.android.tools.build:gradle:2.2.+' // <- USE 2.2.+ version } ... } ... -
Update the gradle version to
2.14.1inandroid/gradle/wrapper/gradle-wrapper.properties:... distributionUrl=https\://services.gradle.org/distributions/gradle-2.14.1-all.zip -
Add the compile line to the dependencies in
android/app/build.gradle:dependencies { compile project(':react-native-image-picker') } -
Add the required permissions in
AndroidManifest.xml:<uses-permission android:name="android.permission.CAMERA" /> <uses-permission android:name="android.permission.WRITE_EXTERNAL_STORAGE"/> -
Add the import and link the package in
MainApplication.java:import com.imagepicker.ImagePickerPackage; // <-- add this import public class MainApplication extends Application implements ReactApplication { @Override protected List<ReactPackage> getPackages() { return Arrays.<ReactPackage>asList( new MainReactPackage(), new ImagePickerPackage() // <-- add this line // OR if you want to customize dialog style new ImagePickerPackage(R.style.my_dialog_style) ); } }
Android (Optional)
Customization settings of dialog android/app/res/values/themes.xml (android/app/res/values/style.xml is a valid path as well):
<?xml version="1.0" encoding="utf-8"?>
<resources>
    <style name="DefaultExplainingPermissionsTheme" parent="Theme.AppCompat.Light.Dialog.Alert">
        <!-- Used for the buttons -->
        <item name="colorAccent">@color/your_color</item>

        <!-- Used for the title and text -->
        <item name="android:textColorPrimary">@color/your_color</item>

        <!-- Used for the background -->
        <item name="android:background">@color/your_color</item>
    </style>
</resources>
If MainActivity is not instance of ReactActivity, you will need to implement OnImagePickerPermissionsCallback to MainActivity:
import com.imagepicker.permissions.OnImagePickerPermissionsCallback; // <- add this import
import com.facebook.react.modules.core.PermissionListener; // <- add this import

public class MainActivity extends YourActivity implements OnImagePickerPermissionsCallback {
  private PermissionListener listener; // <- add this attribute

  // Your methods here

  // Copy from here

  @Override
  public void setPermissionListener(PermissionListener listener)
  {
    this.listener = listener;
  }

  @Override
  public void onRequestPermissionsResult(int requestCode, String[] permissions, int[] grantResults)
  {
    if (listener != null)
    {
      listener.onRequestPermissionsResult(requestCode, permissions, grantResults);
    }
    super.onRequestPermissionsResult(requestCode, permissions, grantResults);
  }

  // To here
}
This code allows to pass result of request permissions to native part.
Usage
var ImagePicker = require('react-native-image-picker');
// More info on all the options is below in the README...just some common use cases shown here
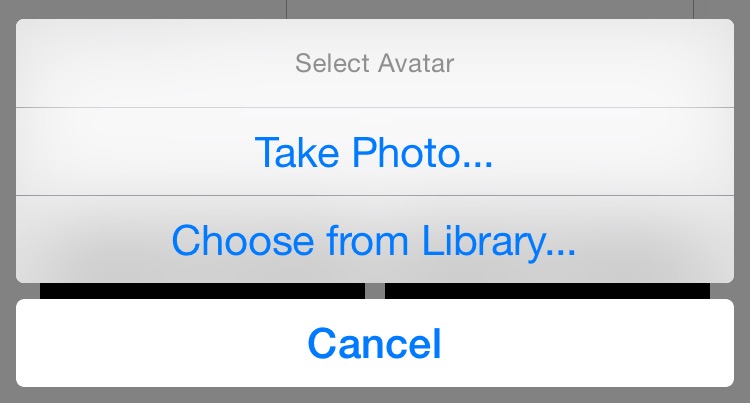
var options = {
title: 'Select Avatar',
customButtons: [
{name: 'fb', title: 'Choose Photo from Facebook'},
],
storageOptions: {
skipBackup: true,
path: 'images'
}
};
/**
* The first arg is the options object for customization (it can also be null or omitted for default options),
* The second arg is the callback which sends object: response (more info below in README)
*/
ImagePicker.showImagePicker(options, (response) => {
console.log('Response = ', response);
if (response.didCancel) {
console.log('User cancelled image picker');
}
else if (response.error) {
console.log('ImagePicker Error: ', response.error);
}
else if (response.customButton) {
console.log('User tapped custom button: ', response.customButton);
}
else {
let source = { uri: response.uri };
// You can also display the image using data:
// let source = { uri: 'data:image/jpeg;base64,' + response.data };
this.setState({
avatarSource: source
});
}
});
Then later, if you want to display this image in your render() method:
<Image source={this.state.avatarSource} style={styles.uploadAvatar} />
Directly Launching the Camera or Image Library
To Launch the Camera or Image Library directly (skipping the alert dialog) you can
do the following:
// Launch Camera:
ImagePicker.launchCamera(options, (response)  => {
  // Same code as in above section!
});

// Open Image Library:
ImagePicker.launchImageLibrary(options, (response)  => {
  // Same code as in above section!
});