React Native Webview Leaflet
A Leaflet map component with no native code for React Native applications.
Why Use This Library
This component is useful if you want to display HTML elements on an interactive map. Since the elements are just HTML items, you can use SVG's, emojis, text, images, etc., and they can even be animated, updated, and changed as required.
Why Not Use This Library
You may know want to use this library if you'd rather use Google map tiles and data vice the tiles and map data from Open Street Maps.

Installation
Install using npm or yarn like this:
npm install --save react-native-webview-leaflet
or
yarn add react-native-webview-leaflet
Usage
and import like so
import WebViewLeaflet from 'react-native-webview-leaflet';
Add the following component to your code.
<WebViewLeaflet
  ref={(component) => (this.webViewLeaflet = component)}
  onLoad={this.onLoad}
  eventReceiver={this} // the component that will receive map events
/>
Additionally, for Version 3, you must handle the map's onLoad event manually as shown below in order pass the map layers to the map:
onLoad = (event) => {
  // log a message showing the map has been loaded
  console.log('onLoad received : ', event);

  // optionally set state
  this.setState(
    {
      ...this.state,
      mapState: { ...this.state.mapState, mapLoaded: true }
    },
    () => {
      // send an array of map layer information to the map
      this.webViewLeaflet.sendMessage({
        mapLayers
      });
    }
  );
}
After loading, the map expects to receive an array of map layer information objects. A sample object showing a MapBox tile layer is shown below.
{
name: 'streets', // the name of the layer, this will be seen in the layer selection control
checked: 'true', // if the layer is selected in the layer selection control
type: 'TileLayer', // the type of layer as shown at https://react-leaflet.js.org/docs/en/components.html#raster-layers
baseLayer: true,
// url of tiles
url: `https://api.tiles.mapbox.com/v4/mapbox.streets/{z}/{x}/{y}.png?access_token=${mapboxToken}`,
// attribution string to be shown for this layer
attribution:
'&copy <a href="http://osm.org/copyright">OpenStreetMap</a> contributors'
}
The format of the object depends on the type of layer to be displayed, and corresponds to the Raster Layers in react-leaflet
https://react-leaflet.js.org/docs/en/components.html#raster-layers
NOTE: Image and VideoOverlay layers do not currently work.
Example objects are shown in the mockMapLayers.js file in this repository.
Communicating with the map
Listening for Events
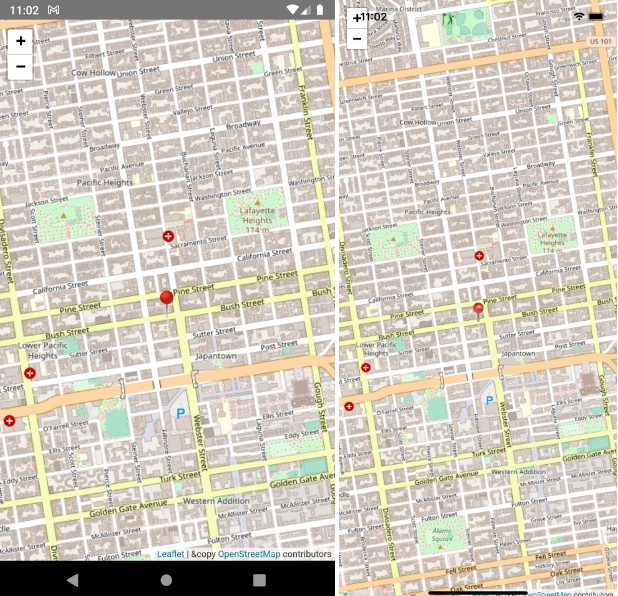
This library supports map clicked, map marker clicked, and the map events that are exposed by Leaflet.
Map Clicked and Map Marker Clicked Events
To receive map clicked and on map marker clicked events, add the following functions to the component that contains the WebViewLeaflet.
onMapClicked = ({ payload }) => {
  console.log(`Map Clicked: app received: ${payload.coords}`);
  this.showAlert('Map Clicked', `Coordinates = ${payload.coords}`);
};

onMapMarkerClicked = ({ payload }) => {
  console.log(`Marker Clicked: ${payload.id}`);
  this.showAlert('Marker Clicked', `Marker ID = ${payload.id}`);
};
Leaflet Map Events
To react to leaflet map events, you need to create functions in your component to handle them. These functions' names must be camelCased and prefixed by 'on'.
For example, to listen for the zoomlevelschange event, you will need to create a function
called onZoomLevelsChange. These functions will receive the following object
{
  center,   // center of the map
  bounds,   // the bounds of the map
  zoom      // the zoom level of the map
}
Sending Events to the Map
The map can be be updated by sending messages from your component to the WebViewLeaflet component via its reference like so:
this.webViewLeaflet.sendMessage({
  zoom: 6,
  locations: this.state.locations,  // an array of locations
  showAttributionControl: this.state.mapState.showAttributionControl, // a boolean controlling whether the map displays its attribution control
  showZoomControl: this.state.mapState.showZoomControl // a boolean controlling whether the map displays its zoom control
});
A react-leaflet component makes up the map that is rendered by WebViewLeaflet. This allows messages like the one above to be used to directly set values in the map's state.
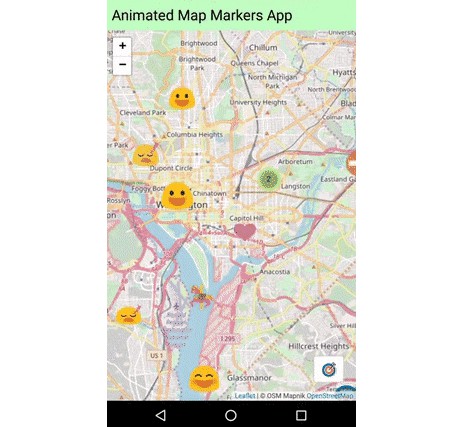
Creating Map Markers
The map builds and displays its markers based on the value of the locations key in its own state. You can update the value of it's locations by sending a message containing an object containing a key of locations and a value that is an array of location objects like the one shown below. An example of such a call and a location object is show below.
// sending locations to the map
this.webViewLeaflet.sendMessage({
  locations: [
  ...this.state.locations]
})
// a location object
{
  id: uuidV1(), // The ID attached to the marker. It will be returned when onMarkerClicked is called
  coords: [LATITUDE, LONGITUDE], // Latitude and Longitude of the marker
  icon: '?', // HTML element that will be displayed as the marker.  It can also be text or an SVG string.

  // The child object, "animation", controls the optional animation that will be attached to the marker.
  // See below for a list of available animations
  animation: {
    name: animations[Math.floor(Math.random() * animations.length)],
    duration: Math.floor(Math.random() _ 3) + 1,
    delay: Math.floor(Math.random()) _ 0.5,
    interationCount
  }
  // optional size for this individual icon
  // will default to the WebViewLeaflet `defaultIconSize` property if not provided
  size: [64, 64],
}
Available Animations
Animations for "bounce", "fade", "pulse", "jump", "waggle", "spin", and "beat" can be specified in the animation.name property of an individual location.
Animation Information
Animations are kept in the file markers.css They are just keyframe animations like this:
@keyframes spin {
  50% {
    transform: rotateZ(-20deg);
    animation-timing-function: ease;
  }
  100% {
    transform: rotateZ(360deg);
  }
}
Working with Tile Layers
In Version 3 you must set the map
onLoad = (event) => {
    console.log('onLoad received : ', event);
    this.setState(
      {
        ...this.state,
        mapState: { ...this.state.mapState, mapLoaded: true }
      },
      () => {
        this.webViewLeaflet.sendMessage({
          mapLayers
        });
      }
    );
  }