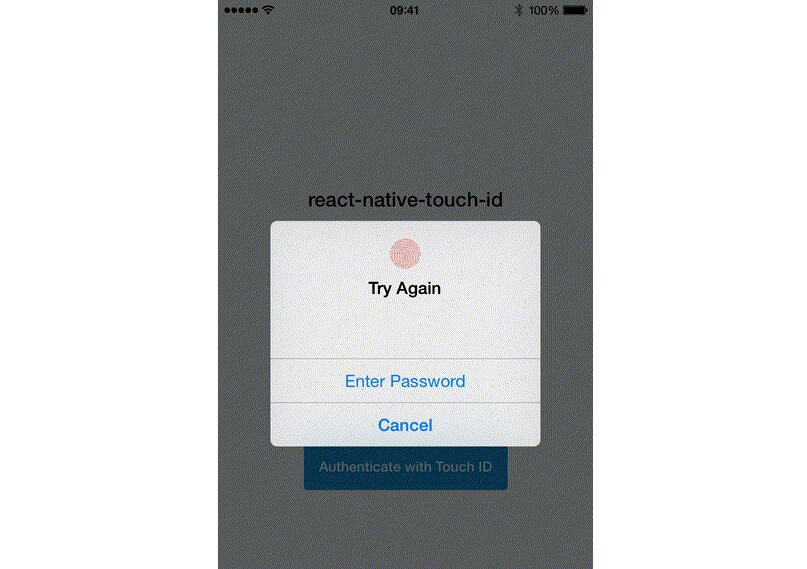
React Native Touch ID
React Native Touch ID is a React Native library for authenticating users with biometric authentication methods like Face ID and Touch ID on both iOS and Android (experimental).

Install
npm i --save react-native-touch-id
or
yarn add react-native-touch-id
Support
Due to the rapid changes being made in the React Native ecosystem, we are not officially going to support this module on anything but the latest version of React Native. The current supported version is indicated on the React Native badge at the top of this README. If it's out of date, we encourage you to submit a pull request!
Usage
Linking the Library
In order to use Biometric Authentication, you must first link the library to your project.
Using react-native link
Use the built-in command:
react-native link react-native-touch-id
Using Cocoapods (iOS only)
On iOS you can also link package by updating your podfile
pod 'TouchID', :path => "#{node_modules_path}/react-native-touch-id"
and then run
pod install
Using native linking
There's excellent documentation on how to do this in the React Native Docs.
Platform Differences
iOS and Android differ slightly in their TouchID authentication.
On Android you can customize the title and color of the pop-up by passing in the optional config object with a color and title key to the authenticate method. Even if you pass in the config object, iOS does not allow you change the color nor the title of the pop-up.
Error handling is also different between the platforms, with iOS currently providing much more descriptive error codes.
App Permissions
Add the following permissions to their respective files:
In your AndroidManifest.xml:
<uses-permission android:name="android.permission.USE_FINGERPRINT" />
In your Info.plist:
<key>NSFaceIDUsageDescription</key>
<string>Enabling Face ID allows you quick and secure access to your account.</string>
Requesting Face ID/Touch ID Authentication
Once you've linked the library, you'll want to make it available to your app by requiring it:
var TouchID = require('react-native-touch-id');
or
import TouchID from 'react-native-touch-id'
Requesting Face ID/Touch ID Authentication is as simple as calling:
TouchID.authenticate('to demo this react-native component', optionalConfigObject)
  .then(success => {
    // Success code
  })
  .catch(error => {
    // Failure code
  });
Example
Using Face ID/Touch ID in your app will usually look like this:
import React from "react"
var TouchID = require('react-native-touch-id');
//or import TouchID from 'react-native-touch-id'

class YourComponent extends React.Component {
  _pressHandler() {
    TouchID.authenticate('to demo this react-native component', optionalConfigObject)
      .then(success => {
        AlertIOS.alert('Authenticated Successfully');
      })
      .catch(error => {
        AlertIOS.alert('Authentication Failed');
      });
  },

  render() {
    return (
      <View>
        ...
        <TouchableHighlight onPress={this._pressHandler}>
          <Text>
            Authenticate with Touch ID
          </Text>
        </TouchableHighlight>
      </View>
    );
  }
};
Methods
authenticate(reason, config)
Attempts to authenticate with Face ID/Touch ID.
Returns a Promise object.
Arguments
-
reason- optional -Stringthat provides a clear reason for requesting authentication. -
config- optional - configuration object for more detailed dialog setup:title- Android - title of confirmation dialogcolor- Android - color of confirmation dialogfallbackLabel- iOS - by default specified 'Show Password' label. If set to empty string label is invisible.
Examples
//config is optional to be passed in on Android
const optionalConfigObject = {
  title: "Authentication Required", // Android
  color: "#e00606", // Android,
  fallbackLabel: "Show Passcode" // iOS (if empty, then label is hidden)
}

TouchID.authenticate('to demo this react-native component', optionalConfigObject)
  .then(success => {
    AlertIOS.alert('Authenticated Successfully');
  })
  .catch(error => {
    AlertIOS.alert('Authentication Failed');
  });
isSupported()
Verify's that Touch ID is supported.
Returns a Promise that resolves to a String of FaceID or TouchID .
Examples
TouchID.isSupported()
  .then(biometryType => {
    // Success code
    if (biometryType === 'FaceID') {
        console.log('FaceID is supported.');
    } else {
        console.log('TouchID is supported.');
    }
  })
  .catch(error => {
    // Failure code
    console.log(error);
  });
Errors
There are various reasons why biomentric authentication may fail. When it does fails, TouchID.authenticate will return an error code representing the reason.
Below is a list of error codes that can be returned on iOS:
| Code | Description |
|---|---|
LAErrorAuthenticationFailed |
Authentication was not successful because the user failed to provide valid credentials. |
LAErrorUserCancel |
Authentication was canceled by the user—for example, the user tapped Cancel in the dialog. |
LAErrorUserFallback |
Authentication was canceled because the user tapped the fallback button (Enter Password). |
LAErrorSystemCancel |
Authentication was canceled by system—for example, if another application came to foreground while the authentication dialog was up. |
LAErrorPasscodeNotSet |
Authentication could not start because the passcode is not set on the device. |
LAErrorTouchIDNotAvailable |
Authentication could not start because Touch ID is not available on the device |
LAErrorTouchIDNotEnrolled |
Authentication could not start because Touch ID has no enrolled fingers. |
RCTTouchIDUnknownError |
Could not authenticate for an unknown reason. |
RCTTouchIDNotSupported |
Device does not support Touch ID. |
More information on errors can be found in Apple's Documentation.


