React Native Drag and Order
An easy to use component for quickly adding a drag and order scrollable list to your app.

Features
- Animations powered with Reanimated v2.
- Compatible with Expo.
- Written in
TypeScript. - Customizable Handle component.
- Utility functions to facilitate reordering of lists.
Installation
$ yarn add @markmccoid/react-native-drag-and-order
# Other dependancies
$ yarn add moti
$ expo install react-native-reanimated react-native-gesture-handler
Usage
The DragDropEntry component will accept children, which will be the items that you would like to be able to drag and order. The children you will be passing should be components that:
- Have an id prop. ** This is important
- Have a height that MATCHES the itemHeight props value provided to the DragDropEntry components itemHeight prop.
NOTE: A prop called isMoving will be injected into each child item. You can use this prop to change behavior when the item is moving versus not. This would be useful if you wanted to change the appearance of an item when it is being moved. The style of your item component could include the following for the background color:
backgroundColor: isMoving ? 'red' : 'white'
Here is an example of using the component.
The DragDropEntry component is the parent component that wraps the children Items that you want to be able to drag and drop. You can create your own Item component for the children or use the provided DragItem component to wrap the values you want to be able to order.
There is a helper function, sortArray, that is very useful in reordering and resetting any position/index field in your list. This helper function is essential when you want to persist the order of your items to your state.
import DragDropEntry, { DragItem, sortArray, TScrollFunctions } from "react-native-drag-and-order";

export type ItemType = {
  id: number | string;
  name: string;
  pos: number;
};
const items = itemList: [
    { id: "a", name: "Coconut Milk", pos: 0 },
    { id: "b", name: "Lettuce", pos: 1 },
    { id: "c", name: "Walnuts", pos: 2 },
    { id: "d", name: "Chips", pos: 3 },
    { id: "e", name: "Ice Cream", pos: 4 },
    { id: "f", name: "Carrots", pos: 5 },
    { id: "g", name: "Onions", pos: 6 },
    { id: "h", name: "Cheese", pos: 7 },
    { id: "i", name: "Frozen Dinners", pos: 8 },
    { id: "j", name: "Yogurt", pos: 9 },
    { id: "k", name: "Kombucha", pos: 10 },
    { id: "l", name: "Lemons", pos: 11 },
    { id: "m", name: "Bread", pos: 12 },
  ];
...

<DragDropEntry
  scrollStyles={{ width: "100%", height: "30%", borderWidth: 1, borderColor: "#aaa" }}
  updatePositions={(positions) =>
        updateItemList(sortArray<ItemType>(positions, items, "pos"))
    }
  getScrollFunctions={(functionObj) => setScrollFunctions(functionObj)}
  itemHeight={50}
  handlePosition="left"
  handle={AltHandle} // This is optional.  leave out if you want the default handle
  enableDragIndicator={true}
>
  {items.map((item, idx) => {
      return (
        <DragItem
          key={item.id}
          name={item.name}
          id={item.id}
          onRemoveItem={() => removeItemById(item.id)}
          firstItem={idx === 0 ? true : false}
        />
      );
    })}
</DragDropEntry>
DragDropEntry Props
It is helpful to see what parts make up the DragDropEntry component. Here is a visual.

-
itemHeight – Required – The height of the items that are returned as children of this component. Needed so that we can calculate where each item should be positions.
-
updatePositions – Required – function that will run after drop that will reorder/update positions. It will be passed the positions array of objects, which you can use to reorder your array OR. you can use the sortArray helper function.
positions = {
  id1: 3,
  id2: 1,
  id3: 2,
  id4: 0,
};
-
[handle – Optional – React component to be used for handle. A default is provided. If you provide your own Handle component, take a look at Handle.tsx for an example. Custom Handle Example

-
handlePosition – Optional – default is ‘left’ – either ‘left’ or ‘right’. Positions the handle component on the left or right of each Item component.
-
enableDragIndicator – Optional – default is ‘false’ – Boolean that turns the drag indicator on or off. The position of the indicator is decided by the handle position. It will be opposite what the handlePosition is.
-
dragIndicator – Optional – React component to be used for drag indicator. The component used will be passed the following props:
<DragIndicator
  itemHeight={itemHeight}
  fromLeftOrRight="left" // Or right depending on the handlePosition. This is opposite of the handle position
  currentPosition={movingPos}
  totalItems={numberOfItems}
  config={dragIndicatorConfig}
/>
-
dragIndicatorConfig – Optional– common config options passed to the dragIndicator. By changing the config items, you may not need to create a custom dragIndicator
- translateXDistance – How far should the drag indicator travel into the item

- indicatorBorderWidth
- indicatorBorderColor
- indicatorBackgroundColor
- indicatorBorderRadius
- translateXDistance – How far should the drag indicator travel into the item
-
enableHapticFeedback – Optional – default is ‘false’ – boolean – Enables haptic feedback when moving an item.
-
scrollStyles – Optional – styles that will be spread on ScrollView styles prop.
-
getScrollFunctions – Optional – function that passes scroll function so calling component can scroll list to start or end.
-
Implementation:
-
const [scrollFunctions, setScrollFunctions] = React.useState<ScrollFunctions>();
...
<DragDropEntry
    getScrollFunctions={(functionObj) => {
      setScrollFunctions(functionObj);
    }}
    ...
> ... </DragDropEntry>
-
Now, the scrollFunctions variable can call the following:
scrollFunctions.scrollToEnd() or scrollFunctions.scrollToStart() or scrollFunctions.scrollToY(yPos)
sortArray helper function usage
The most common use case for Drag to Reorder will involve an array of items that you want to be able to reorder. To be practical, you will want to update the new sorted array somewhere to persist the state of that array.
This is what the updatePositions property is for. It accepts a function, which will be called every time your list of items order is changed. A positions object will be passed as the only argument to the function. You can use this object to sort your own array, or use the sortArray helper function.
First, the shape of the positions object:
export type Positions = {
  [id: string]: number;
};

// the key is the id in your original array, the value is the current position
// in the scrollview.
//
const positionExample = {
  a: 0,
  c: 3,
  b: 1,
  d: 2,
};
sortArray accepts the positions object, your item array and an object that lets you tell the function the name of your position field (if you use one) and the name of the idField. The Position Field is only needed if you use it, the idField is required, but will default to “id” if nothing is passed.
Here is an example usage:
<DragDropEntry
	scrollStyles={{ width: "100%", height: "30%", borderWidth: 1, borderColor: "#aaa" }}
	updatePositions={(positions) =>
				updateItemList(sortArray<ItemType>(positions, items, { positionField: "pos" }))
		}
  ...
>
	...
</DragDropEntry>
NOTE: The sort array will always return the passed items array sorted and if your objects in the array include a position property. This is optional and you do NOT need a position key in your object in the array.
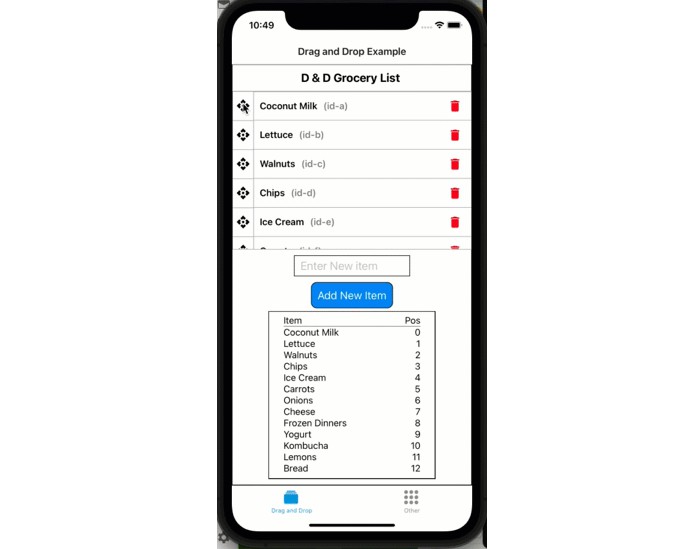
Full Example in Single file
If you have all the base requirements sent, you should be able to past the following into your
App.tsxand run a full working example:import React from "react"; import { StyleSheet, Text, View, SafeAreaView, ScrollView, TextInput, TouchableOpacity, } from "react-native"; import DragDropEntry, { DragItem, sortArray, updatePositionArrayField, TScrollFunctions, Positions, } from "@markmccoid/react-native-drag-and-order"; export type ItemType = { id: number | string; name: string; pos: number; }; const itemData = [ { id: "a", name: "Coconut Milk", pos: 0 }, { id: "b", name: "Lettuce", pos: 1 }, { id: "c", name: "Walnuts", pos: 2 }, { id: "d", name: "Chips", pos: 3 }, { id: "e", name: "Ice Cream", pos: 4 }, { id: "f", name: "Carrots", pos: 5 }, { id: "g", name: "Onions", pos: 6 }, { id: "h", name: "Cheese", pos: 7 }, { id: "i", name: "Frozen Dinners", pos: 8 }, { id: "j", name: "Yogurt", pos: 9 }, { id: "k", name: "Kombucha", pos: 10 }, { id: "l", name: "Lemons", pos: 11 }, { id: "m", name: "Bread", pos: 12 }, ]; export default function App() { // prevNumberOfItems used in useEffect (commented out by default) const prevNumberOfItems = React.useRef(0); const [newItem, setNewItem] = React.useState(""); const [items, setItems] = React.useState<ItemType[]>(itemData); // add an item to the end of the items array const addItem = (itemValue: string) => { setItems((prev) => [...prev, { id: prev.length + 1, name: itemValue, pos: prev.length }]); }; // remove item with id passed. Use the updatePositionArrayField helper to make sure our // "pos" key within our ItemType is updated to make the index it lines up with. // NOTE: you do not need a position key/field in you item objects. You may just need // the array to have the proper order and if so, the position field is not needed. const removeItemById = (id: string | number) => setItems((prev) => updatePositionArrayField<ItemType[]>( prev.filter((item) => item.id !== id), "pos" ) ); // Store the scroll functions for our dragdrop list const [scrollFunctions, setScrollFunctions] = React.useState<TScrollFunctions>(); //************************************************* */ return ( <SafeAreaView style={styles.container}> <Text style={styles.title}>D & D Grocery List </Text> <View style={styles.separator} /> <DragDropEntry scrollStyles={{ width: "100%", height: "30%", borderWidth: 1, borderColor: "#aaa" }} updatePositions={(positions: Positions) => { setItems(sortArray<ItemType>(positions, items, { positionField: "pos" })); }} getScrollFunctions={(scrollFuncs: TScrollFunctions) => setScrollFunctions(scrollFuncs)} itemHeight={50} handlePosition="left" // handle={AltHandle} enableDragIndicator={true} dragIndicatorConfig={{ translateXDistance: 100, indicatorBackgroundColor: "#abcabcaa", indicatorBorderRadius: 20, }} // dragIndicator={testDragIndicator} > {items.map((item, idx) => { return ( <DragItem key={item.id} name={item.name} id={item.id} itemHeight={50} onRemoveItem={() => { removeItemById(item.id); }} /> ); })} </DragDropEntry> <View style={{ flexDirection: "column", alignItems: "center" }}> <TextInput style={{ width: 200, // height: 30, borderWidth: 1, paddingHorizontal: 10, paddingVertical: 5, margin: 5, marginTop: 10, fontSize: 20, }} placeholder="Enter New item" value={newItem} onChangeText={setNewItem} // onSubmitEditing={(e) => addItem(e.nativeEvent.text)} /> <TouchableOpacity style={{ padding: 10, borderWidth: 1, margin: 5, backgroundColor: "#0084fa", borderRadius: 10, }} onPress={() => { addItem(newItem); setNewItem(""); }} > <Text style={{ color: "white", fontSize: 19 }}>Add New Item</Text> </TouchableOpacity> <TouchableOpacity style={{ padding: 10, borderWidth: 1, margin: 5, backgroundColor: "#0084fa", borderRadius: 10, }} onPress={() => { scrollFunctions?.scrollToStart(); }} > <Text style={{ color: "white", fontSize: 19 }}>Scroll To Start</Text> </TouchableOpacity> </View> <View style={{ width: "70%", height: "40%", borderWidth: 1, padding: 5, marginBottom: 10 }} > <ScrollView stickyHeaderIndices={[0]} style={{ marginHorizontal: 10, paddingHorizontal: 10 }} > <View key={0} style={{ borderBottomColor: "#777", borderBottomWidth: 1 }}> <View style={{ flexDirection: "row", width: "100%", justifyContent: "space-between", }} > <Text style={{ fontSize: 16 }}>Item</Text> <Text style={{ fontSize: 16 }}>Pos</Text> </View> </View> {items.map((item) => ( <View key={item.id} style={{ flexDirection: "row", justifyContent: "space-between" }} > <Text style={{ fontSize: 16 }}>{`${item.name}`}</Text> <Text style={{ fontSize: 16 }}>{`${item.pos}`}</Text> </View> ))} </ScrollView> </View> </SafeAreaView> ); } const styles = StyleSheet.create({ container: { flex: 1, alignItems: "center", justifyContent: "flex-start", borderWidth: 1, // borderColor: "red", }, title: { marginTop: 10, fontSize: 20, fontWeight: "bold", }, separator: { marginVertical: 5, height: 1, width: "80%", }, });
-


Custom Handle Example
You have full control over the handle and can customize how it looks. This could be changing the icon or the appearance. Here is an example:

Here is the code for the handle:
type DragHandleIconProps = {
  size: number;
  color?: string;
  style?: StyleProp<TextStyle>;
};
const DragHandleIcon = ({ size, color, style }: DragHandleIconProps) => {
  return <MaterialIcons name="drag-handle" size={size} color={color} style={style} />;
};

const MyHandle: React.FC = () => (
  <View
    style={{
      height: 50,
      alignItems: "center",
      justifyContent: "center",
    }}
  >
    <View
      style={{
        borderWidth: 1,
        borderColor: "#aaa",
        borderRadius: 10,
        marginLeft: 4,
        marginRight: 2,  // Create a space between handle and item
        height: 45,
        backgroundColor: "white",
        justifyContent: "center",
        alignItems: "center",
        paddingHorizontal: 5,
      }}
    >
      <DragHandleIcon size={25} />
    </View>
  </View>
This is how you would use that handle in your Drag and Order component:
...
      <DragDropEntry
        updatePositions={(positions) =>
          updateTags(sortArray<TagArray>(positions, tagData, { idField: "tagId" }))
        }
        itemHeight={50}
        handlePosition="left"
        handle={MyHandle} // Here we are using our custom handle
        enableDragIndicator
        dragIndicatorConfig={{ translateXDistance: 100 }}
      >
        {tagData.map((item, idx) => {
          return (
            <TagItem
              key={item.tagId}
              id={item.tagId}
              name={item.tagName}
              height={50}
              onDeleteTag={onDeleteTag}
              onEditTag={onEditTag}
            />
          );
        })}
      </DragDropEntry>
...