store-locator-react-native
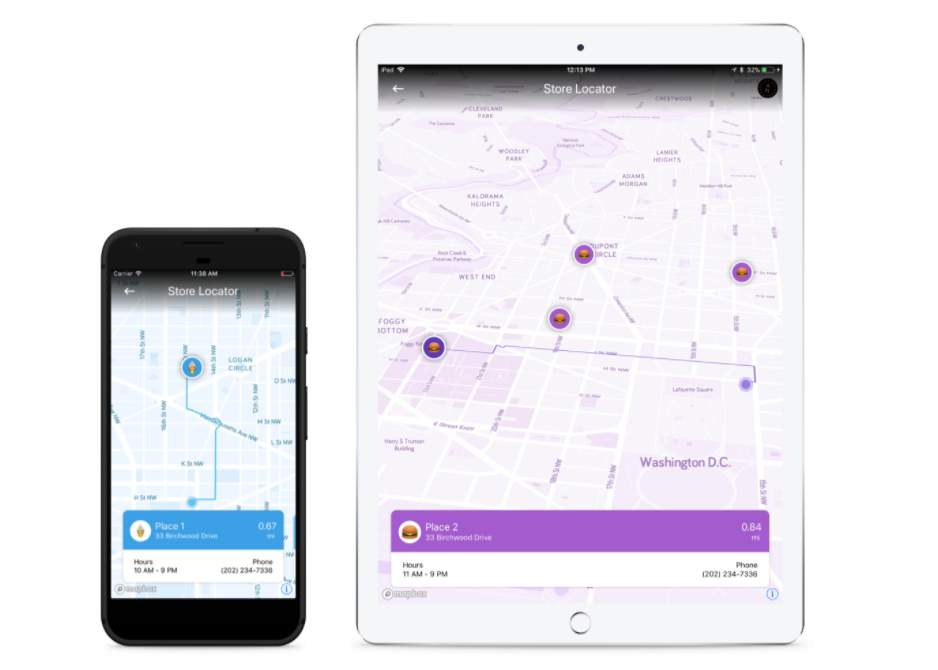
The React Native Locator Kit is a downloadable project for you to add beautiful plug-and-play Store Locators to your React Native applications. Use the Kit to allow your users to find and browse store locations, view additional info for each store, and preview the distance and route to the store. Not building for a store owner or a business? You can use this project to locate anything from bike share hubs to ATMs to your neighborhood parks.
Included in the Kit:
- Source files for the app
- Five UI themes
- A sample dataset in the form of a GeoJSON file
- Code for retrieving directions to store locations with the Mapbox Directions API
What can I customize?
We built this Kit to cut down on the set-up and development time needed to add a Store Locator into your app. Use our starter themes and features as a plug-and-play solution, or further customize your Store Locator with our flexible build.
Add custom markers
Use our pre-built markers, or add in your own by creating your own icon, using your company’s logo, or another open source image.
Card icons
Customize the style of the interactive scrolling cards (i.e. pop-ups) included in your Store Locator.
Bringing your own data
Add as many store locations as you wish as a GeoJSON file. Remember that you could use this Kit to locate not just stores, but anything else like bike share hubs, ATMs, parks, or even your friends!
Map
The Kit comes with five UI starter themes, but you can further customize these themes as you see fit. Or create your own custom map styles by using Mapbox Studio to build a style that fits your brand.
Routing profile
The Kit includes the use of the Mapbox Directions API to display estimated travel distances and display driving routes to store locations. It’s also possible to modify the routing profile to use our cycling or walking directions.
Installation
Dependencies
- node
- npm
- React Native >= 0.47.1
- React Native Mapbox GL >= 6.0.2 or master
- Prop Types
Git
git clone [email protected]:mapbox/store-locator-react-native-gl.git
cd store-locator-react-native
Yarn
yarn add @mapbox/store-locator-react-native
Npm
npm install @mapbox/store-locator-react-native --save
Getting Started
There are a few steps needed to get up and running.
- We’ll want to create a JSON dataset to use with the StoreLocatorKit here is a link to the one in our example application. There are some required feature properties needed. The
id,name,phoneFormatted,addressFormatted, andhoursFormattedare all required fields that we use to render the cards on the bottom of the screen.
{
  "id": "1",
  "type": "Feature",
  "geometry": {
    "type": "Point",
    "coordinates": [
      -77.034084142948,
      38.909671288923
    ]
  },
  "properties": {
    "name": "Place 1",
    "phoneFormatted": "(202) 234-7336",
    "addressFormatted": "33 Birchwood Drive, North Arlington",
    "hoursFormatted": "10 AM - 9 PM"
  }
}
- Next we’ll want to create a theme to use in our application
import MapboxGL from '@mapbox/react-native-mapbox-gl';
import StoreLocatorKit from '@mapbox/store-locator-react-native';

import reallyCoolIcon from '...';
import evenCoolerIcon from '...';
import ultraCoolIcon from '...';

export const theme = new StoreLocatorKit.Theme({
  icon: reallyCoolIcon,
  activeIcon: evenCoolerIcon,
  styleURL: MapboxGL.StyleURL.Light,
  primaryColor: `#A35BCD`,
  primaryDarkColor: '#5D39BA',
  directionsLineColor: '#987DDF',
  cardIcon: ultraCoolIcon,
  cardTextColor: '#6A159B',
  accentColor: '#C7A8D9',
});
- Now all we need to do is add the map to our application. We need to do our basic setup with MapboxGL by setting the access token, here is a snippet. You can head over to our Maps SDK for React Native if you want any more information
async componentWillMount () {
  if (!IS_IOS) {
    const isGranted = await MapboxGL.requestAndroidLocationPermissions();
    this.setState({ isGranted: isGranted });
  }
  MapboxGL.setAccessToken(MAPBOX_ACCESS_TOKEN);
}
- The last and final step is adding the store locator map to our application.
import places from '...'; // this is the dataset from step one
import { theme } from '...'; // theme from step 2
...

<StoreLocatorKit.MapView
  simulateUserLocation
  accessToken={MAPBOX_ACCESS_TOKEN}
  theme={theme}
  centerCoordinate={this.state.initialLocation}
  featureCollection={places}
  zoomLevel={13}
  style={styles.matchParent} />
Example Application
There is an example application bundle with this repo, to show you a working example of a store locator. Here are the steps needed to get it up and running
cd RNStoreLocatorExample
npm i
npm start
Open up App.js in the example application and you should see a message to enter your access token. Just replace this with your access token from Mapbox Studio.
const MAPBOX_ACCESS_TOKEN = '<Enter your access token>';
There are a few ways you can run the project. You can open up Xcode or Android Studio and run them for there (highly recommend to open up the example project in each once) or you can use the React Native CLI
Android
react-native run-android
iOS
react-native run-ios